Note:
giftflickSdk is only available after the window load.
This reference documents every object and method available in gift flick browser-side JavaScript library.
No installation via a package manager is required. Just add the following snippet to the beginning of the <head> tag within your markup.
<script src="https://sdk.giftflick.com.au/gift-creation/prod/v2.0.3/index.umd.js" async="true"></script>
<link rel="stylesheet" href="https://sdk.giftflick.com.au/gift-creation/prod/v2.0.3/style.css" />
Before you can use the Giftflick widget, you need to initialize the SDK. The `initial` function is used to set up the SDK with the necessary configuration.
giftflickSdk is only available after the window load.
<script type="text/javascript">
window.addEventListener('load', () => {
  const giftflickSdk = window.giftflickSdk;
  giftflickSdk.initial({
    apiKey: 'YOUR_API_KEY',
    checkoutUrl: 'YOUR_CHECKOUT_URL',
    customerEmail: 'CUSTOMER_EMAIL', // Optional
    option: 'pre', // Optional
    orderId: 'ORDER_ID', // Optional Only required if option set to post
    stage: 'prod', // by default is prod
  });
});
</script>Please contact hello@giftflick.com.au if you haven’t already registered or received an API key from us.
by default is "/checkout". pass in different checkout url if your checkout page is other than "/checkout". e.g some sites checkout url is '/payment' in that case, you can use checkoutUrl:"/payment"
pre - gift flick will be shown on product / cart page.
post - gift flick will be shown on order confirmation page.
Customer email. Send an email to the customer which contains a unique link to a gift story.
your customer order id. This will trigger the order on gift flick. PS: only add this when the order is confirmed.
by default is 'prod'.
staging - use for testing purpose only.
prod - use for production.
Add products to giftflick widget.
You can set the products that will be displayed in the Giftflick widget using the `setProducts` function.
<script type="text/javascript">
window.addEventListener('load', () => {
  const giftflickSdk = window.giftflickSdk;
  giftflickSdk.setProducts([
    {
      productImage: 'https://example.com.au/image-url-1.jpg',
      productPrice: 19.99, // Optional
      productTitle: 'Product 1',
      productType: 'physical-product', // Optional
    },
    {
      productImage: 'https://example.com.au/image-url-1.jpg',
      productPrice: 19.99, // Optional
      productTitle: 'Product 2',
      productType: 'gift-card', // Optional
    },
  ]);
});
</script>The product image url. It need be a full url. e.g https://example.com.au/image-url-1.jpg
The product title. The name of the product, use to show on the giftflick widget.
The product price. Tracking purpose only. It will not show on the giftflick widget.
by default is 'physical-product'.
physical-product - physical product.
gift-card - gift card.
Add HTML tag <giftflick-button button-text="Send as Instant Gift"></giftflick-button> to where you want to show the gift flick button. by default is "Send as Instant Gift". You can change the button text to whatever you want. `onclick` attribute is optional. You can add your own custom logic when the button is clicked.
<!DOCTYPE html>
  <html lang="en">
      ...
      <div class="products">
          <h1>Hello, world!</h1>
          <p>...</p>
          <giftflick-button onclick="" button-text="Send as Instant
                    Gift"> </giftflick-button>
      </div>
      ...
</html>You can use the event hook to add custom functionality when the checkout button is clicked in the Giftflick widget. note. if you call onCheckoutClick hook, it's going to disable the redirect link to checkout url
<script type="text/javascript">
const { onCheckoutClick } = giftflickSdk.hook();
onCheckoutClick(() => {
  // Your custom logic when the checkout button is clicked
});
</script>
Copy the script below and paste it into a html file. It also runs on static html.
<!DOCTYPE html>
<html lang="en">
    <head>
    <script src="https://sdk.giftflick.com.au/gift-creation/prod/v2.0.3/index.umd.js" async="true"></script>
    <link rel="stylesheet" href="https://sdk.giftflick.com.au/gift-creation/prod/v2.0.3/style.css" />
    </head>
    <div class="products">
        <h1>Hello, world!</h1>
        <p>...</p>
        <giftflick-button onclick="addProducts" button-text="Send as Instant Gift"></giftflick-button>
    </div>
    <script>
      window.addEventListener('load', () => {
        const giftflickSdk = window.giftflickSdk;
        giftflickSdk.initial({
          apiKey: 'c8a09911-9f0f-4a4f-bb83-giftflick',
          checkoutUrl: '/checkout',
          option: 'pre', // Optional
          stage: 'prod', // by default is prod
        });
      });
      /**
      * add Products to giftflick widget
      * Trigger set products method on button click
      * @param ()
      */
      const addProducts = () => {
        window.giftflickSdk.setProducts([
          {
            productImage: 'https://www.giftflick.com.au/one-page/images/demo-product.png',
            productPrice: 19.99, // Optional
            productTitle: 'Product 1',
            productType: 'physical-product', // Optional
          },
          {
            productImage: 'https://www.giftflick.com.au/one-page/images/demo-product.png',
            productPrice: 19.99, // Optional
            productTitle: 'Product 2',
            productType: 'gift-card', // Optional
          },
        ]);
      }


    </script>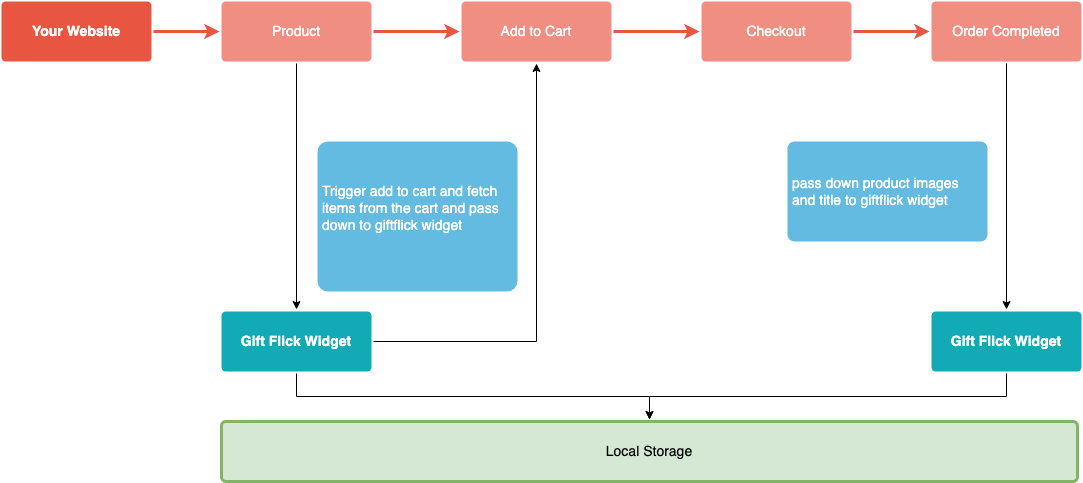
</html>Order confirmation script is almost identical to the script above. The only differences are the options we use. orderId is required to action the confirmation. Our Module store user input data in the local storage. It contains the data that the user has agreed to use gift flick as the medium while putting through the order. If yes, it will trigger the order on our end.
The local storage access can only works if the main page and the order confirmation page are on the same domain. It will retrieve the details through the local storage.
orderId, customerEmailand option to `post` options fields value should be your customer order id and email address. We are only use the email address to send the gifter(user) a notification email that contain a unique link to the gift story.
The user can also create gift flick if they missed it on the product page. Our software will check user input and if they haven't created a gift flick, The button will appear and allow users to re-generate the customised video.
<!DOCTYPE html>
<html lang="en">
    <head>
        <script src="https://sdk.giftflick.com.au/gift-creation/prod/v2.0.3/index.umd.js" async="true"></script>
        <link rel="stylesheet" href="https://sdk.giftflick.com.au/gift-creation/prod/v2.0.3/style.css" />
    </head>
    <div class="products">
        <h1>Hello, world!</h1>
        <p>...</p>
        <giftflick-button button-text="Send as Instant Gift"></giftflick-button>
    </div>
    <script>
      window.addEventListener('load', () => {
        const giftflickSdk = window.giftflickSdk;
        giftflickSdk.initial({
          apiKey: 'c8a09911-9f0f-4a4f-bb83-giftflick',
          orderId: '12345',
          customerEmail: 'tomo@giftflick.com.au',
          option: 'post', // Optional
          stage: 'prod', // by default is prod
        });

        /**
        * add products to giftflick widget
        * Product of the order confirmation page
        */
        giftflickSdk.setProducts([
          {
            productImage: 'https://www.giftflick.com.au/one-page/images/demo-product.png',
            productPrice: 19.99, // Optional
            productTitle: 'Product 1',
            productType: 'physical-product', // Optional
          },
          {
            productImage: 'https://www.giftflick.com.au/one-page/images/demo-product.png',
            productPrice: 19.99, // Optional
            productTitle: 'Product 2',
            productType: 'gift-card', // Optional
          },
        ]);
      });
    </script>
</html>gift flick is a Frontend widget which run on any browser as long as users have javascript enabled. You only need to have the script on the product and order confirmation page.
Our widget stores user inputs in local storage. As long as the product and order confirmation page sitting in the same domain. It can share the same data.
You can use the following css class to style the button.
giftflick-button::part(main-button) {
  color: black;
  border: dashed 2px black;
  background-color: #fec0ff;
}
You can use the following css class to style the learn more text.
giftflick-button::part(learn-more) {
  color: red;
}